There are instances where you want to automatically forward certain incoming mails or all incoming mails to another email address. This is possible in Gmail, and I have been using this feature for a while now.
In this article, you will learn how to auto forward specific emails in Gmail. Since this tutorial is for beginners, the steps will be straightforward and easy to follow.
How to Auto Forward Specific Emails in Gmail
You will learn how to automatically forward specific emails either from a particular sender or keywords in mail.
Follow the steps below to get started:
- Open Gmail on your computer. (go to gmail.com with any browser on your computer)
- Log in to your Gmail account. (Click Log in on the Gmail website if you are not already logged in.)
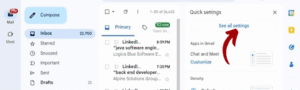
- Once you are logged in, click Settings or the Settings icon on the top right.

- Now, click on See all settings.
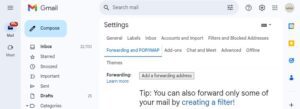
- Click on Forwarding and POP/IMAP or the Forwarding tab.
- Now, click on Add a forwarding address. (this is found in the Forwarding: section)
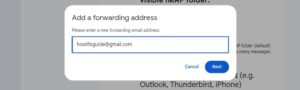
- Enter the email address you want your mails forwarded to, and click Next.
- On the next screen, click on Proceed and then OK to confirm the forwarding address. (You might be prompted to verify that it’s you; complete the verification and continue.)
- A message containing a verification link will be sent to the forwarding email address. Open the email and click on the verification link from Google to confirm the forwarding request.
- Go back to the Settings page in Gmail and refresh your browser.
- After refreshing your browser, Disable forwarding will be selected. Do not change this option since we want to auto forward specific emails and not all.
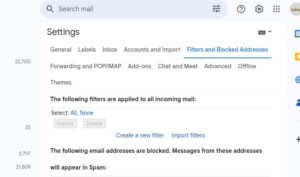
- On the Settings page, click on the Filters and Blocked Addresses tab.
- Click on Create a new filter.
- From the pop-up, in the From field, add the emails you want their messages forwarded. (You can also use Subject, Has the words, Doesn’t have, or other options.)
- After you input the email you want to forward, click on Create filter.
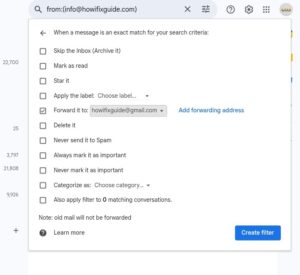
- Select Forward it to, and choose the email you added earlier.
- Finally, click on Create filter. (You might need to complete a Google verification by clicking the Continue button.)


Now, all incoming messages from you specified email addresses or words will be forwarded to your selected email. You can add more filters or either edit or delete the ones you have created.
In case you might be wondering, this option is not available on the Gmail mobile app. You will need a desktop browser to be able to access this option in settings.
There is a workaround if you want to use your smartphone (Android or iPhone) to access these settings. You will need to switch to desktop mode on your browser to access the desktop version of Gmail.
Conclusion
This feature is helpful for people who want to receive important incoming mail in another email account. The best part is that it can also be forwarded to a custom email address like [email protected].
FAQs
Can Gmail automatically forward certain emails?
Yes, Gmail can automatically forward certain emails. This option can be configured in the settings page of your Gmail account.